FortiGate Fabric Connector (also known as "SDN Connector") for Google Cloud is a powerful tool which allows leveraging cloud metadata instead of IP addresses and subnets when configuring firewall policies. In this lab you configure the connector and learn how to create dynamic address objects in FortiGate next-gen firewall.
Note: this lab does not cover using SDN Connector for HA failover.
Before you start
Before you start completing the lab tasks it is worth spending a moment learning your lab environment and consoles. You can skip this part if you are already familiar with Fortinet Qwiklabs.
Qwiklabs environment will create a dedicated temporary access to the Google Cloud for you. You do not need your own accout to complete the labs. The environment will be available for a limited time - there is no possibility to pause the lab so make sure you have time to complete it. If you don't make it - don't worry, you can start the lab again later.
The webpage you are reading right now is your Lab Console. You will find the instructions how to complete each step here. On the right you can find navigation frame with links to individual sections of the lab. After you start the lab, on the left side under the Start Lab / End Lab button you will find the time left for the lab, a button opening your GCP Console and a series of information you will need to complete the lab. Start your lab now if you haven't done so yet.
GCP console
Clicking the Open Console button on top left will open a new browser tab with Google login form. Use the and to log in. Please accept the terms and conditions, but do NOT subscribe to e-mail updates.
On the left you will find a list of all services available in GCP which can be toggled on and off using the "burger menu" icon in the top-left corner. In this lab you will use Compute Engine, VPC network, and Network services. The latter is not visible in the default view and can be found after expanding the list using MORE PRODUCTS link at the bottom. Feel free to use pin / unpin button visible after hovering over list elements to build your own list of most used services.
Products, individual resources and documentation can be also easily found using the search bar located at the top of the screen.
This lab resources (VM instances and VPC networks) are distributed across two projects - IDs of both will be listed on the left once the lab starts and provisions. Use the drop-down located in the top bar to switch between the projects. Initially the RECENT tab will show only one project, go to ALL to show all. You might find it convenient to open two consoles - one for each project.
FortiGate console
FortiGate virtual appliances can be managed using web GUI available over HTTPS protocol on the default port or using command line interface in GUI or via SSH. Configuration of FortiGate HA cluster is managed only using the primary instance and automatically replicated to secondary instance. Secondary instance management console can be optionally accessed using its public IP address to verify the clustering and replication status.
Overview
Objectives
In this lab you complete the following tasks:
- Create custom role and service account
- Configure FortiGate SDN Connector using IAM metadata
- Create dynamic firewall address objects and expand visibility beyond local VPC and local project
- Configure SDN connector without use of IAM metadata
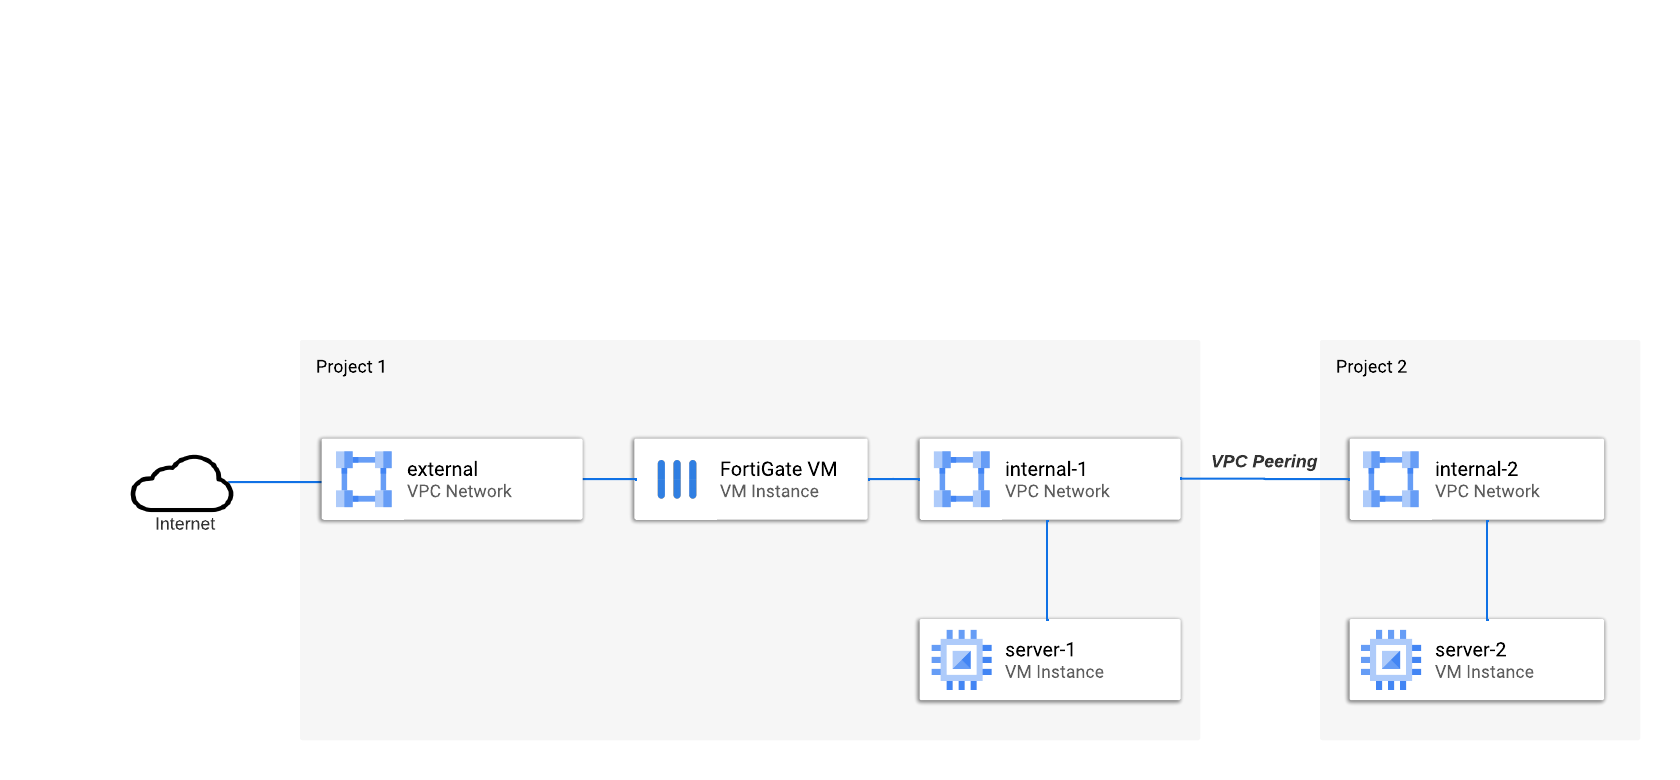
Architecture
This lab uses a simplified architecture with a single FortiGate. Two protected servers are connected to two different VPC networks located in separate projects. VPC networks are connected using VPC Peering. Both servers are assigned a network tag demo-tag
Task 1: Create custom role and service account
Google IAM offers thousands of very precise permissions defining access to the services. Often permissions are mapped 1-to-1 with API methods (eg. compute.instances.stop or compute.instances.start). Individual permissions are grouped into Roles to make them manageable. Besides default roles you can create custom roles for special use. You will now create a custom read-only role for FortiGate SDN Connector.
Note: Legacy basic roles (Owner, Editor, Viewer) provided very broad access for resources and were used together with scopes to limit access to a selected service. An access policy with basic roles includes target resource, role and scope. As modern IAM roles (both custom and predefined) are much more precise and service specific, they are always used with a generic cloud-platform scope (hidden in cloud web console).
- Open Google Cloud web console and select project in the drop-down at the top
- Go to IAM & Admin > Roles
- Click + Create role button
- Provide an ID (eg. FortigateSdnReader) and a descriptive Title (eg. FortiGate SDN Connector Role (read-only))
- Add the following permissions (be careful, Add Permission dialog has two filter fields - one for roles and one for permission properties):
- compute.instances.list
- compute.zones.list
- container.clusters.list
- container.nodes.list
- container.pods.list
- container.services.list
- save new role by clicking Create button
Create service account
Roles cannot be assigned direcly to VM instances as they do not have an IAM identity themselves. Google Cloud IAM supports two types of identities: user accounts and service accounts. In the next step you will create a new service account and assign it the custom role created earlier in your project.
- Open IAM & Admin > Service Accounts
- Click + Create service account button at the top
- Provide Service account ID (eg. "fortigatesdn" - it will serve the purpose of account name in the project) and optionally a display name and description
- Click Create and continue
- in step 2 grant new service account access to project using custom role created earlier
- Leave the step 3 empty and close the service account creation process by clicking Done
Write down or copy the service account e-mail. You will need it later in Task 4.
Task 2: Configure SDN Connector using IAM metadata
Once you have your service account ready you can configure VM instances to use it. FortiGates can impersonate either a manually configured service account or use metadata service to leverage the service account assigned to a VM. For FortiGates running in Google Cloud it is recommended to use the IAM metadata.
- Go to Compute Engine > VM instances and find the FortiGate VM instance (fortigate-vm)
- Stop the instance if it's running
- Open instance details and click Edit button at the top
- Scroll down to Identity and API access section
- For Service account select your new service account from a drop-down list
- Click Save and start the VM. Starting the system will take a minute or two.
Task 3: Create dynamic address
It's time to configure FortiGate to resolve dynamic addresses.
Start by configuring FortiGate to query Google Compute API for metadata:
- Open FortiGate web console
- Go to Security Fabric > External Connectors and click

- Select Google Cloud Platform (GCP)
- Provide Name (eg. gcp) and click OK
Now configure a new address object, which you can later use in firewall policy:
- Go to Policy & Objects > Addresses and click , Address
- Provide name for new address object (eg. "demo-tag")
- For Type select Dynamic
- For SDN Connector select connector you created above (eg. gcp)
- For Filter pick from the list Tag=demo-tag
- Click OK to save the object
- The object will initially appear on the list with a warning as Unresolved dynamic address. Dynamic objects are refreshed by default every 60 seconds - wait a minute and reload the Address list page.
- Hover cursor over the name of new address object and click View Matched Addresses. The list now contains one IP address of server-1 VM instance (10.1.0.11).
Task 4: Expand coverage to multiple projects
Configure service account access in second project
Service accounts and custom roles are linked to projects but service accounts (just like user accounts) can be given access to multiple projects. You first configure a copy of the FortigateSdnReader role in second project and then assign it to the existing service account.
- In Google Cloud web console select project
- Open IAM & Admin > Roles
- Click + Create role button
- Provide an ID (eg. FortigateSdnReader) and a descriptive Title (eg. FortiGate SDN Connector Role (read-only))
- Add the following permissions:
- compute.instances.list
- compute.zones.list
- container.clusters.list
- container.nodes.list
- container.pods.list
- container.services.list
- save new role
- Go to IAM & Admin > IAM and click Grant access
- For New principals paste the service account e-mail you copied earlier in Task 1.
- For Assign roles select the fortigateSdnReader role you created above
- Click Save to save new access settings
Add second project to FortiGate configuration
FortiGate automatically detects only the project it is running in. In multi-project deployments you have to explicitly provide the list of all projects in the configuration.
- Open FortiGate web console
- Go to Security Fabric > External Connectors and double-click the connector to edit it
- In GCP Connector section enable Projects and select Advanced
- Click to add Project 1 ID leaving Zones empty
- Repeat the step above to add Project 2 to the list
- Click OK to save the changes
- Wait a minute for the dynamic address to refresh
- Go to Policy & Objects > Addresses
- Hover over the name of dynamic address object you created earlier and click View Matched Addresses. The list now contains two IP addresses for server-1 and server-2 from both projects and VPC networks.
Task 5: Configure SDN Connector manually using service account key
Automatic retrieval of service account token you used above is available only for network virtual appliances running in Google Cloud. But you can use external fabric connector with any FortiGate regardless of form factor or cloud it is running in. In this case authentication of SDN Connector must be configured manually. In this task you reconfigure SDN connector to use manual key configuration instead of automatic token retrieval from IAM metadata.
- Open Google Cloud web console, switch to {{ project1.project_id | Project 1 }} project
- Go to IAM & Admin > Service Accounts and click the fortigatesdn-ro account you created earlier
- Select Keys tab, click Add key button, and select Create new key
- For Key type select JSON and click Create button
- Save the .json file on your computer
- Open FortiGate web console and go to Security Fabric > External Connectors
- Double-click the connector to edit it and disable Use metadata IAM option
- For Service account email enter the email of service account you created earlier
- From the downloaded JSON file extract the value of private_key field replacing "\n" with newlines. The methods for extracting and converting the value differ between operating systems:
- in Linux / MacOS shell: use
jq utility: cat service_account-key.json | jq ".private_key" -r
- in Windows: use Notepad to extract the part between
-----BEGIN PRIVATE KEY----- and -----END PRIVATE KEY----- and replace \\n with \r\n
- Paste the extracted key value in Private key field and save the changes by clicking OK button
Troubleshooting
In FortiGate web console click the terminal button to open FortiGate CLI. To debug the GCP connector issue the following commands:
diag debug app gcpd -1
diag debug enable
Congratulations
You learned how to configure FortiGate to leverate cloud metadata for automatic discovery of network addresses. You can now end the lab by clicking End lab button.


