This labs demontrates how to secure and manage outbound traffic using FortiGate next-gen firewall and multiple public IP addresses.
Overview
Using FortiGate as a secure gateway for cloud workloads provides traffic monitoring going way beyond cloud native solutions available in Google Cloud. Thanks to its next-gen firewall capabilities FortiGate can apply precise access policies based on VM and K8S metadata, internet service types, website categories, geography and more. Thanks to use of external Network Load Balancer, it's also possible to allow connections using specific public IP addresses depending on the type of traffic. In this lab you focus on enabling outbound connectivity and managing multiple public IPs associated with FortiGate HA cluster.
Objectives
In this lab you complete the following tasks:
- Attach multiple public IPs to FortiGate HA cluster
- Use FortiGate firewall policies to select Public IP for a given traffic
Before you start
Before you start completing the lab tasks it is worth spending a moment learning your lab environment and consoles. You can skip this part if you are already familiar with Fortinet Qwiklabs.
Qwiklabs environment will create a dedicated temporary access to the Google Cloud for you. You do not need your own accout to complete the labs. The environment will be available for a limited time - there is no possibility to pause the lab so make sure you have time to complete it. If you don't make it - don't worry, you can start the lab again later.
The webpage you are reading right now is your Lab Console. You will find the instructions how to complete each step here. On the right you can find navigation frame with links to individual sections of the lab. After you start the lab, on the left side under the Start Lab / End Lab button you will find the time left for the lab, a button opening your GCP Console and a series of information you will need to complete the lab. Start your lab now if you haven't done so yet.
GCP console
Clicking the Open Console button on top left will open a new browser tab with Google login form. Use the and to log in. Please accept the terms and conditions, but do NOT subscribe to e-mail updates.
On the left you will find a list of all services available in GCP which can be toggled on and off using the "burger menu" icon in the top-left corner. Commonly used in Fortinet labs are Compute Engine, VPC network, and Network services. The latter is not visible in the default view and can be found after expanding the list using MORE PRODUCTS link at the bottom. Feel free to use pin / unpin button visible after hovering over list elements to build your own list of most used services.
Products, individual resources and documentation can be also easily found using the search bar located at the top of the screen.
FortiGate console
FortiGate virtual appliances can be managed using web GUI available over HTTPS protocol on the default port or using command line interface in GUI or via SSH. Configuration of FortiGate HA cluster is managed only using the primary instance and automatically replicated to secondary instance. Secondary instance management console can be optionally accessed using its public IP address to verify the clustering and replication status.
Architecture
The initially deployed architecture consists of a pair of FortiGate appliances deployed in the usual active-passive high-availability setup, two workload servers and a proxy. All three workload servers are deployed behind the firewalls without public IP address - they can be reached from Internet and they can reach Internet only through FortiGates.
Initially there are 4 public IP addresses:
- IP address of External Load Balancer (ELB) frontend
- Management address of primary FortiGate
- Management address of secondary FortiGate
- Ephemeral external IP of Cloud NAT service
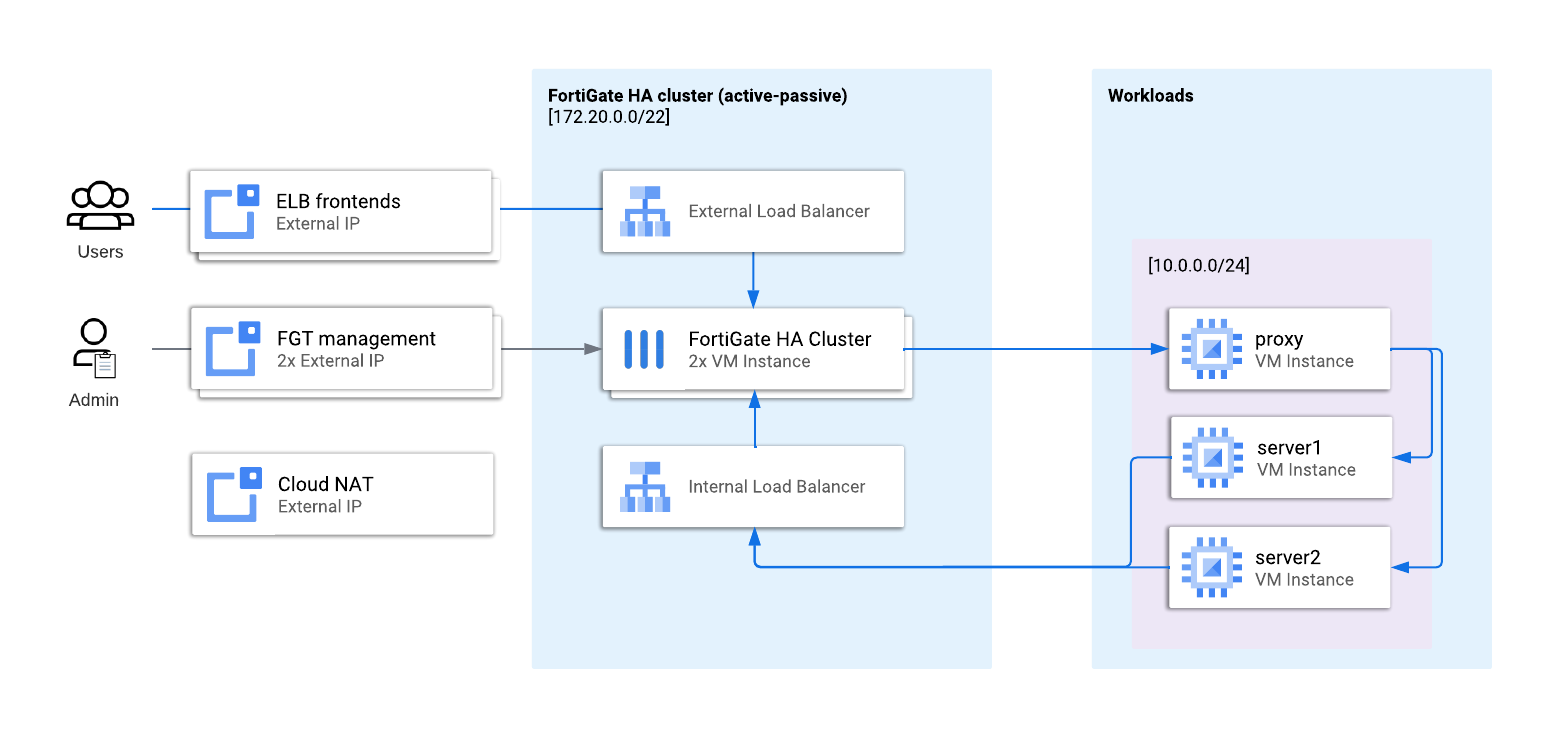
ELB frontend is configured in FortiGate as a Virtual IP and redirected to the proxy server giving access to workload server1 () and server2 .
Both workload servers are running a simple web application showing their names and IP address used when they try to access Internet (every HTTP connection to the server makes it initiate a new connection to Internet). Throughout this lab you will be manipulating settings to change the IP address shown by server1 and server2.
Initial setup overview
Once your lab is provisioned, open your Google Cloud web console by clicking the Open console button. Explore the initial setup, in particular:
- Open fgtbes-elb* (External Load Balancer) in Network services > Load balancing; you will notice that ELB now has one frontend and forwards all ports and all protocols (L3_DEFAULT) to one healthy FortiGate instance.
- In VPC network > IP adresses select External IP addresses tab to identify all four addresses created during lab provisioning, In use by column indicates which address is assigned to load balancer forwarding rule, FortiGate VM instances and Cloud Router (for Cloud NAT).
- All VM instances are visible in Compute Engine > VM instances together with their assigned internal and external IPs; note that FortiGate instances use addresses from 172.20.0.0/16 subnets, while workloads use 10.0.0.0/8 IP space.
Task 1: Leverage ELB for outbound traffic
Start by opening web page for Test server 1 (you can find the link in Lab Details on the left side of the instructions). You will notice that the web app reports the public address which can be found in Cloud Console VPC network / IP addresses section - the one attached to Cloud NAT.
Open the FortiGate console to trace the connection logs:
- Open Log & Report section in left menu
- Open Forward Traffic
- Double-click on any of entries with source 10.0.0.101 (server1)
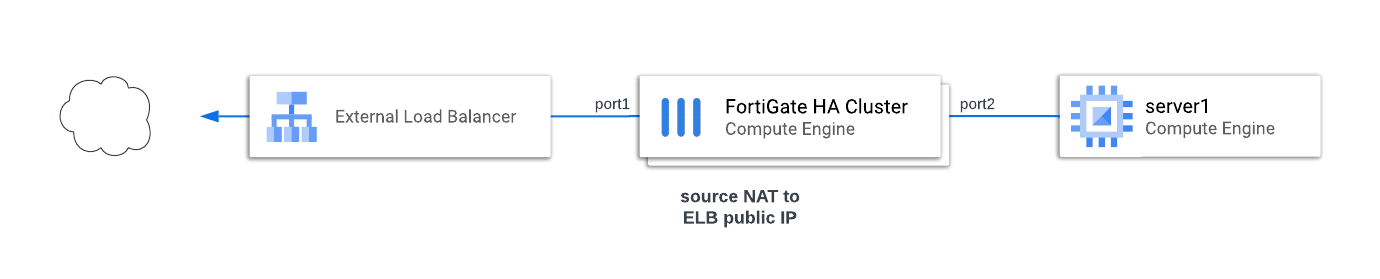
In the Source section of Log Details you will notice that FortiGate performed a source NAT to its private IP address on port1 interface (in 172.20.0.0/24 subnet). After processing by FortiGate, the connection was source-NATted again by Cloud NAT before being finally passed to Internet with the public IP reported by the web app.

To control the public IP address used by the connection you have to modify the settings in firewall policy:
- Open Firewall Policy option in Policy & Objects section
- Double-click the allow-all-out policy
- Find the Firewall/Network Options section with NAT enabled and set to Use Outgoing Interface Address
- Change settings to Use Dynamic IP Pool
- In the field below select fgteip-eip1 IP Pool, which has been preconfigured for you with the public IP address of External Load Balancer
- Click OK button to save changes to firewall policy
- Refresh the server1 website
Verify the connections are now source-NATted with ELB frontend address.
The IP address reported by the web app has changed to the same one you used to access the web app - the frontend address of External Load Balancer. If you check the FortiGate traffic logs you will notice that now FortiGate source-NATs the connection straight to the public IP address. No secondary NAT is performed in this setup.
Task 2: Attach new public IP
To reserve a new public IP address for use with the FortiGate cluster you have to define a new frontend for the external load balancer by performing the following steps:
- In Google Cloud web console choose VPC network from the "hamburger menu" at the top left corner
- Go to IP addresses and click Reserve a new external static address. Remember or write down the reserved IP address, you will need it later
- Choose a name for new address (eg. "new-addr"), select region matching your deployment (us-central1) and click Reserve
- Preinstalled load balacer uses advanced features so a new frontend will have to be added to it using CLI. Open Cloud Shell by clicking the icon on the top bar, to the right from the search form
- Create new forwarding rule with the following command (replacing "new-addr" with the name of your new external IP address):
gcloud compute forwarding-rules create new-addr --region us-central1 \
--backend-service fgtbes-elb-us-central1 \
--ip-protocol L3_DEFAULT --ports all \
--address new-addr
Configure FortiGate for health checks
Each load balancer frontend generates its own health probes, which need to be responded. In a standard design health probes are responded directly by FortiGate and the easiest way to configure then will be:
- open FortiGate web console and go to Network > Interfaces
- double-click port1 to edit it
- add a new secondary IP address by clicking + Create new and providing new public IP address with netmask /32
- health probes for an interface need to be configured using CLI - open FortiGate CLI Console by clicking the command line prompt icon from the right side of the top menu
- run the following command:
config system interface
edit "port1"
config secondaryip
edit 2
set allowaccess probe-response
next
end
next
end
- repeat the same on secondary FortiGate
Network interface addresses are exempted from FGCP synchronisation, so your newly added secondary IP address is empty on the secondary FortiGate. Remember to log into secondary FortiGate and add the ELB address for the health check to function properly.
Task 3: Modify FortiGate to use new external IP address
In order to use the new external IP address for outbound traffic you have to:
- Create an IP Pool object
- Modify firewall policy
In this lab you use a dynamic address object to differentiate public IP based on Google Cloud network tag. Dynamic addresses based on metadata are commonly used in public cloud environments and greatly enhance agility of your firewall configuration.
IP Pool
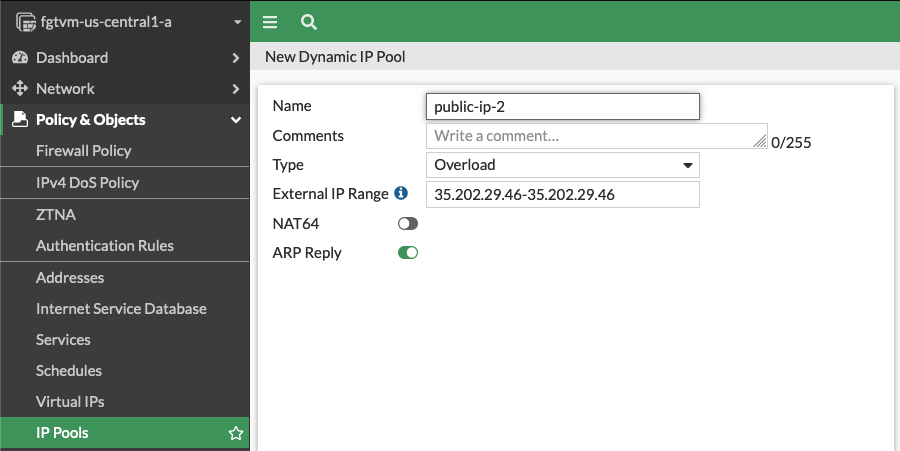
FortiGate uses objects called IP Pools to configure source NAT. To configure a new one:
- Login to primary FortiGate console
- Open IP Pools in Policy & Objects section
- Click + Create New button to create a new IP Pool
- Provide the new ELB public address as a 1-address range (eg. "1.2.3.4-1.2.3.4")
- Name your pool and click OK to save it
Dynamic address
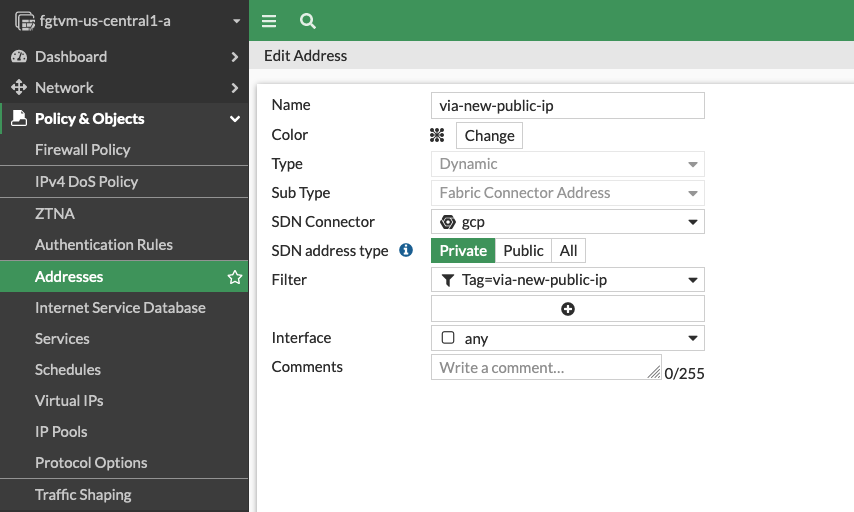
To see if we can use different public addresses for different workloads you'll create a dynamic address selecting all VMs with via-new-public-ip network tag (in this lab - server2 VM instance).
- in primary FortiGate web console select Addresses from Policy & Objects section
- click +Create New and select Address
- name your address (eg. via-new-public-ip)
- change Type to Dynamic
- in SDN Connector select gcp
- in Filter select Tag=via-new-public-ip
- click OK to save the new address object
Dynamic object will be initially visible in the list with red exclamation mark. It will disappear once the object gets resolved (by default every 60 seconds). Continue to the next step.
Firewall Policy
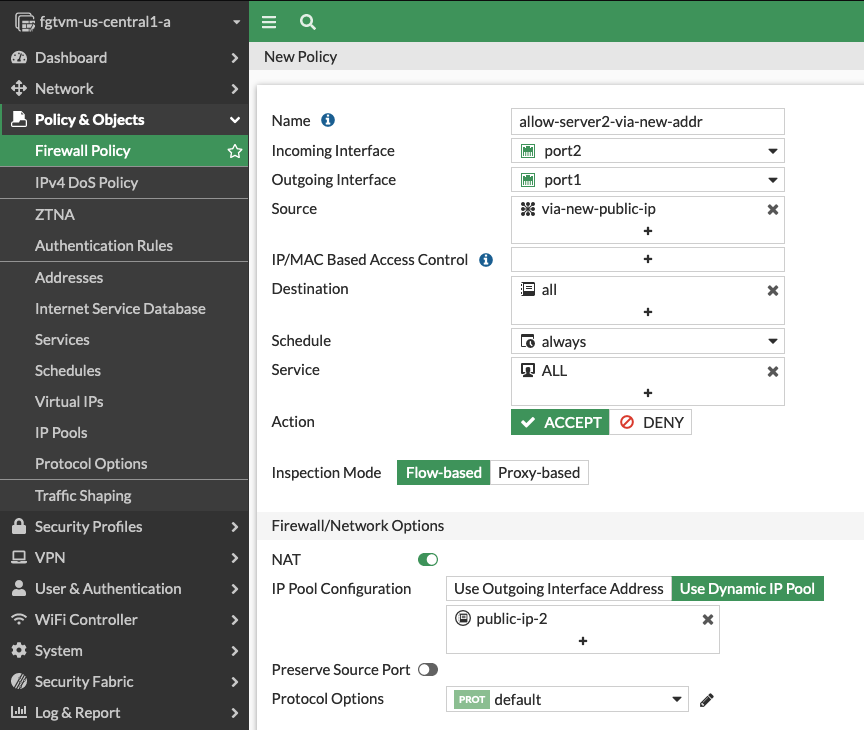
In this subtask you create a new firewall policy, that makes only server2 use the new public IP address while server1 keeps using the previous one.
- Open Firewall Policy from Policy & Objects section
- Click + Create New button to create a new policy
- Provide a name for your policy
- For Incoming Interface select port2 and as outgoing interface select port1
- Click Source and select via-new-public-ip
- Click Destination and select all
- For Service select ALL
- In NAT section click Use Dynamic IP Pool and select your new IP Pool in the list below
Firewall policy list is ordered. Remember to drag-and-drop your new firewall policy above the old allow-all-out policy to avoid overshadowing it (there's a handle for drag-and-drop on the left side of every entry in the policy list).
Testing changes
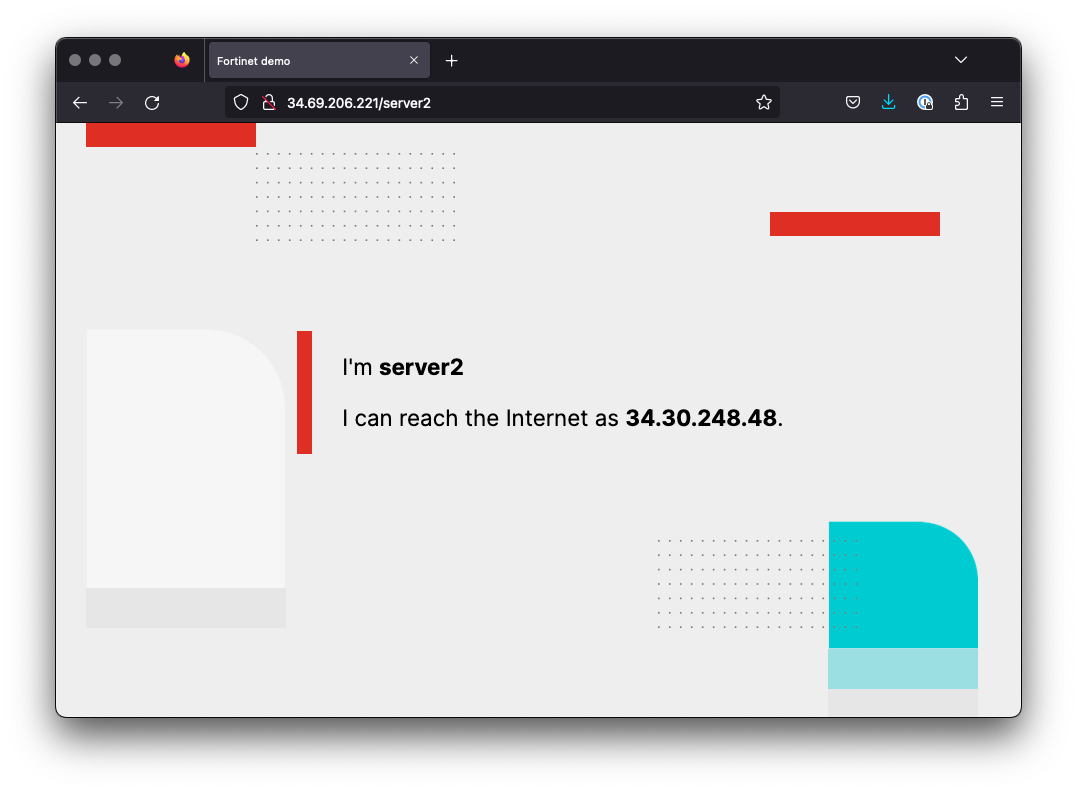
Open the web page for server2 () to make sure it now uses the new external address to access Internet.
Verify server2 now uses different address than server1.
Task 4: HA Failover
Public address configuration remains unchanged upon the HA failover event. To simulate it:
- Switch to GCP web console
- In the Virtual machines list find the fgtvm1-us-central1-a instance
- Stop the instance
- Wait few seconds for the VM shutdown to take effect
- Refresh the lab websites for server1 and server2 to make sure they still work and report correct public IP addresses
- Log into the secondary FortiGate management console at
- Go to System > HA to verify that the fgtvm2 instance now took over the Primary role
Note that in public cloud both FortiGate instances can use the same public IP address without triggering a duplicated IP problem.
Congratulations
You completed the lab and learned how to manage outbound traffic using multiple public IP addresses. Thank you for using Fortinet Qwiklabs.


